
How to set up an eSIM before your trip so your phone works abroad
This article contains affiliate links. If you buy something through one, we may earn a commission at no extra cost to you. Read our full affiliate disclosure.
You land in a new country and want your phone to work straight away. An eSIM lets you do that without finding a SIM card shop at the airport or paying your home carrier’s roaming rates. This article covers how to set up an eSIM before travel, so your phone is already working the moment you land.
An eSIM is a digital SIM built into your phone. There is no card to buy, swap, or lose. You can set it up before you leave home, while you still have reliable WiFi, so your phone is ready to use data the moment you land.
What an eSIM is, in plain English
A SIM card is the small chip that connects your phone to a mobile network and gives it a phone number. An eSIM does the same job, but it is built into the phone itself instead of being a removable card.
Apple describes an eSIM as a way to activate a cellular plan from your carrier without a physical SIM. Samsung describes it as a digital SIM that lets you use mobile data without a physical SIM card. Both descriptions mean the same thing: the plan lives inside your phone, not in a piece of plastic.
For travel, this matters because you can buy and install a local or regional data plan from a separate eSIM provider before you leave, and use it alongside your normal home number.
A few widely used eSIM providers worth checking for your trip: Airalo, Saily, and Yesim. Coverage, plan length, and price vary by destination and provider, so compare their plans for the specific countries on your itinerary before you buy.
How to check if your phone can use a travel eSIM
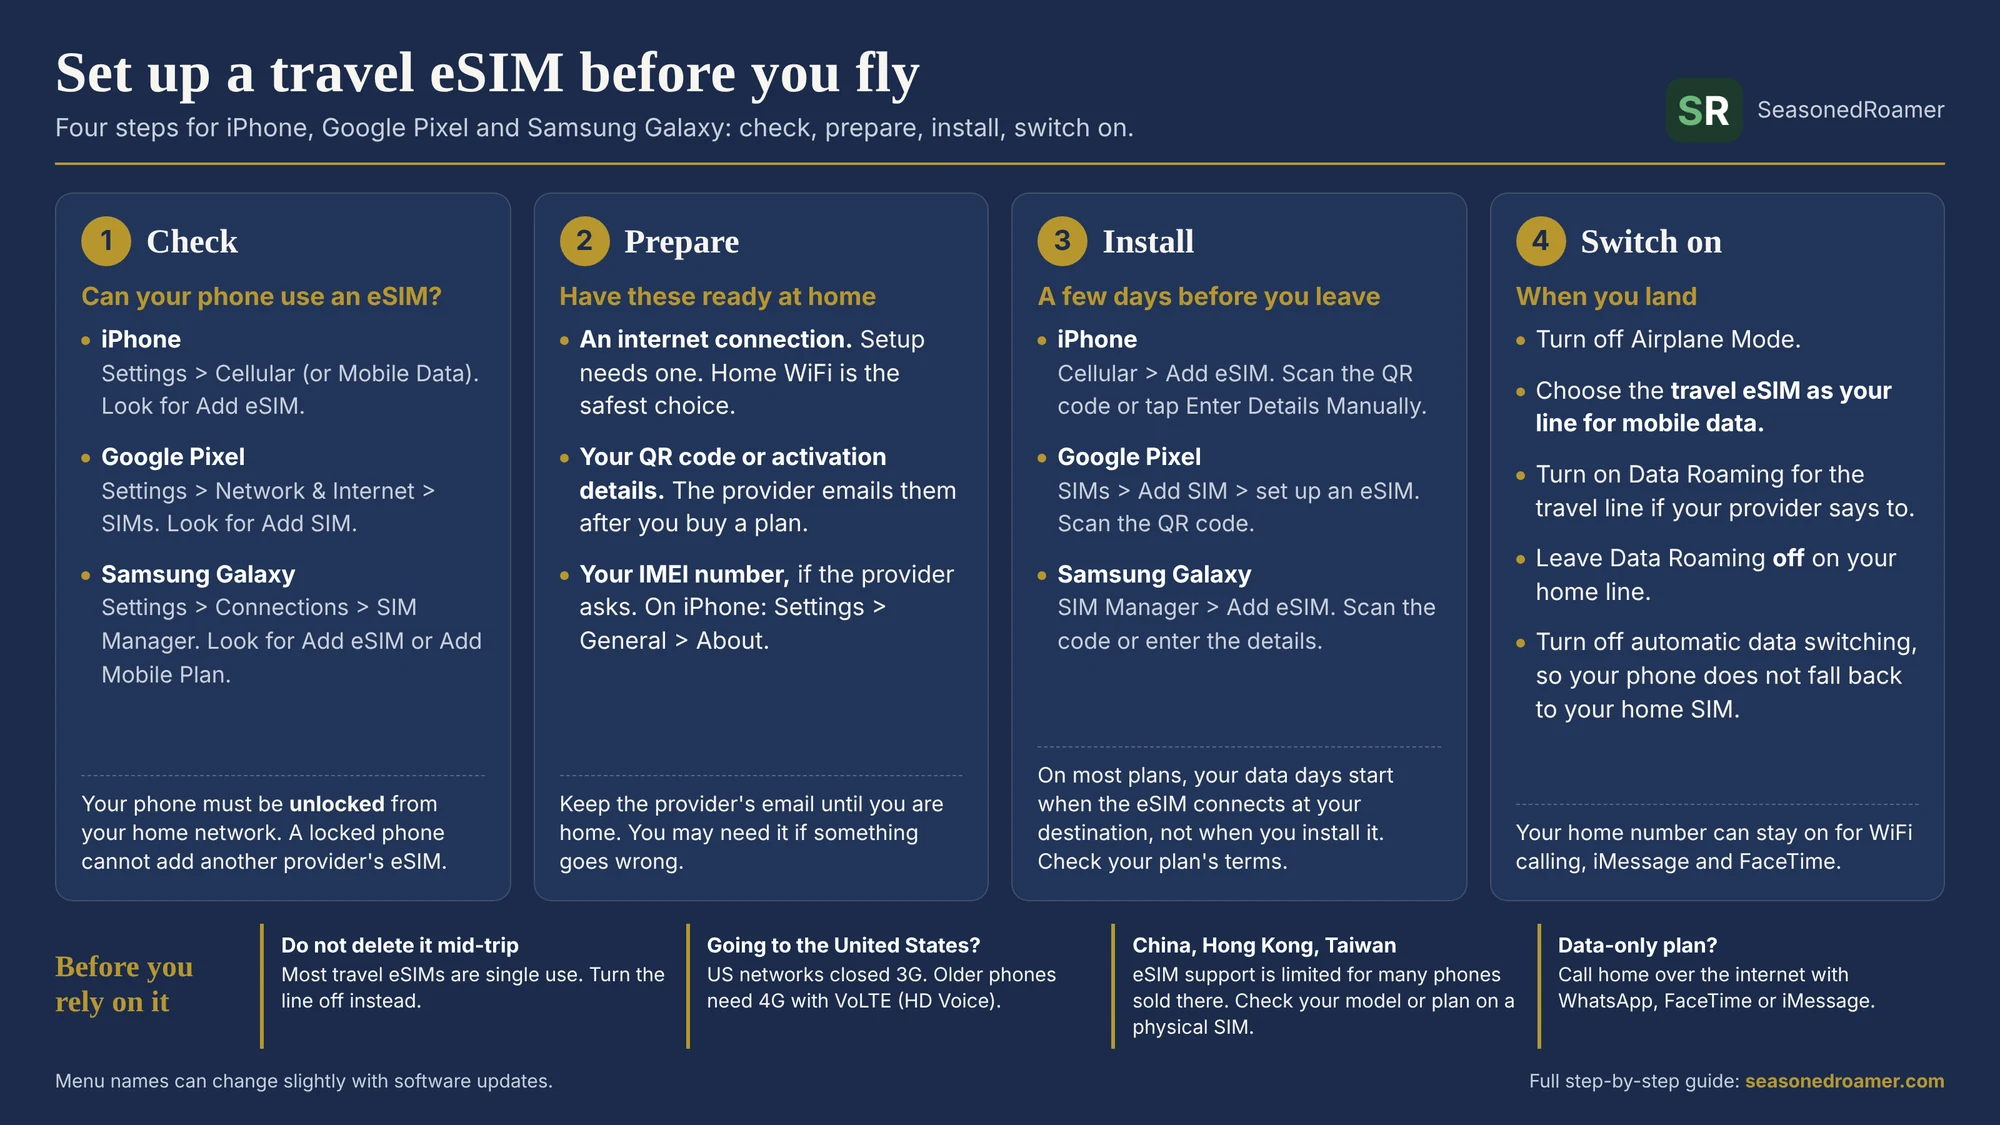
Phone makers do not publish one fixed list of eSIM-compatible models, because support depends on the exact phone, the country it was sold in, and the carrier it is locked to. The most reliable way to check is in your own phone’s settings.
- On an iPhone: open Settings, then tap Cellular (or Mobile Data). If you see an option to add an eSIM, your phone supports it.
- On a Google Pixel: open Settings, then tap Network & Internet, then SIMs. Look for an option to add a SIM and set up an eSIM.
- On a Samsung Galaxy: open Settings, then tap Connections, then SIM Manager. Look for an option called Add eSIM or Add Mobile Plan.
- On other Android phones: the menu names vary by brand, but the option is usually found in the same area as your mobile network or SIM settings. Check your phone maker’s own support pages if you cannot find it.
Two extra things affect whether you can use an eSIM, separate from the phone model itself. First, your phone needs to be unlocked from your home carrier. A locked phone usually cannot add an eSIM from a different provider. Second, eSIM availability can depend on which country your phone was bought in, even on a supported model. Samsung’s own support page states this directly: eSIM may not work even on a listed device, depending on the device’s country of origin.
Some eSIM providers suggest dialling *#06# to check for an EID number, a unique ID for the eSIM hardware in your phone, as a quick compatibility test. This can work on many phones, but checking your Settings menu directly, as described above, is the more reliable method confirmed by the phone makers themselves.
What you need before you set one up
- An internet connection. Apple states plainly that eSIM setup requires an internet connection. This can be WiFi or an existing mobile data connection, though WiFi is the safer choice for a larger download.
- A QR code or activation details from your eSIM provider. These are normally emailed to you after you buy a plan, and include a code you scan or enter manually.
- Your phone’s IMEI number, which some providers ask for. On an iPhone, this is under Settings, then General, then About. On a Pixel or Samsung phone, look under Settings, in the section covering your device or phone information. The exact label varies by phone model and software version.
Set up your eSIM before you leave home, while you are on a reliable WiFi connection, rather than waiting until you land. This avoids relying on uncertain airport or hotel WiFi to download a large file. On most plans, the days of data you have paid for only start counting once the eSIM connects to a network at your destination, not the moment you install it at home. This can vary by provider, so check the terms of your specific plan before you rely on it.
Your phone also needs power once you arrive. Read our guide to plug adapters and voltage to see whether your charger needs a simple plug adapter or a voltage converter.
How to add a travel eSIM
The exact wording on screen can shift slightly with software updates, so treat the steps below as the general path rather than an exact match for every version of iOS, Android, or your phone’s settings app.
iPhone
- Open Settings and tap Cellular (or Mobile Data).
- Tap Add eSIM, or Set Up Cellular if you have no line active yet.
- Choose to scan the QR code from your provider, or tap Enter Details Manually to type in the activation code.
- Make sure your iPhone is connected to WiFi or a mobile network before you start. eSIM setup needs an internet connection.
Google Pixel
- Open Settings, tap Network & Internet, then SIMs.
- Tap Add SIM, then choose to set up an eSIM.
- Scan the QR code your provider sent you when prompted.
- Pixel phones from the Pixel 3a onward can run a physical SIM and an eSIM at the same time. Pixel 7 and later models can run two eSIMs together, where the carrier supports it.
Samsung Galaxy
- Open Settings, tap Connections, then SIM Manager.
- Tap Add eSIM (this may be labelled Add Mobile Plan, depending on your software version).
- Scan the QR code from your provider, or choose to enter the activation details manually.
- Most Samsung Galaxy phones can only have one eSIM active at a time. This is different from newer Pixel phones, which can run two.
When to install your travel eSIM and when to switch it on
These are two separate steps. You install the eSIM at home. You switch it on when you land.
Install it at home, a few days before you fly
Install the eSIM while you have reliable WiFi at home. Airalo notes that installing an eSIM needs a stable internet connection, which can be hard to find once you are travelling.
Doing it a few days before you leave gives you time to contact your provider if the code does not work.
Buying early is usually fine. Airalo states that the validity period does not start when you buy the eSIM. Depending on the plan, it starts when the eSIM is installed or when it connects to a network. Some eSIMs must be used within a set time after you buy them, so check the package details first.
Do you need to be in the country to install it?
No. You install it from home. The plan is built for your destination, so it connects to a network once you arrive in a country it covers.
Switch it on when you land
- Turn off Airplane Mode once the crew says you can.
- Set the travel eSIM as your line for mobile data.
- iPhone: Settings, then Cellular (called Mobile Service in some countries), then Cellular Data. Choose the travel line.
- Google Pixel: Settings, then Network & internet, then SIMs. Under Mobile data, choose the travel SIM.
- Samsung Galaxy: Settings, then Connections, then SIM Manager. Set the travel eSIM as your preferred SIM for data.
- Turn on Data Roaming for the travel eSIM line if your provider’s setup steps ask for it.
- Leave Data Roaming off on your home line so it cannot run up roaming charges. On an iPhone with two lines, you set Data Roaming separately for each number.
On an iPhone running iOS 26 or later, you may see a “Turn On Travel eSIM” message when you arrive. Tap it. Choose Travel eSIM Only, or Travel eSIM and Current eSIM. Then tap Continue.
Do not delete it until you are home
Removing an eSIM is not like taking out a SIM card. Airalo says some removed eSIMs can be recovered and others cannot be reinstalled, so you would need a replacement. If you want the line off during your trip, turn it off instead of deleting it. On a Pixel, turn off “Use this SIM”. On a Samsung, turn the eSIM off in SIM Manager.
Running two numbers at once
iPhone, Pixel, and Samsung Galaxy phones can all keep your home SIM active alongside a new travel eSIM. Your home number stays reachable through WiFi calling, iMessage, or FaceTime, while your travel eSIM handles your data abroad. WiFi calling lets your phone make and receive calls over a WiFi connection, so it keeps working even where you have no mobile signal of your own. You do not need to pay for international roaming on your home plan to stay reachable this way.
After you install your travel eSIM, check your phone’s mobile data setting and confirm it is set to use the new eSIM, not your home SIM. If automatic data switching is left on, some phones quietly fall back to the home SIM for data, which can mean unexpected roaming charges. Turn this off, or check it carefully, to avoid the problem.
Setting up an eSIM for a trip to the United States
A US trip follows the same steps as any other. You install the eSIM at home and switch it on when you land. Your phone must be unlocked, as explained above. Then check three things before you fly.
Make sure your phone works on US 4G networks
The main US networks have closed their 3G networks. According to the Federal Communications Commission, AT&T began phasing out 3G in February 2022, T-Mobile closed its 3G network in July 2022, and Verizon planned to finish by the end of 2022. The FCC warns that 3G phones, and some older 4G phones that do not support Voice over LTE (VoLTE, also called HD Voice), may not be able to make calls, send texts, or use data. If your phone is several years old, check its settings or manual for 4G LTE with VoLTE, or ask your home network before you buy a plan.
Check whether the plan includes calls and texts
Read the plan details before you buy. Some travel eSIM packages give you mobile data only. Others also include calls and texts. A data-only plan still lets you call home over the internet with apps such as WhatsApp. On an iPhone, Apple says FaceTime and iMessage keep working on your home number while the travel eSIM handles your data.
Watch for charges on your home number
If you keep your home SIM switched on, Apple notes that you might still pay roaming fees on it. Ask your home network what it charges for calls and texts received in the United States. Set the travel eSIM as your mobile data line, as described in the section above, so your phone does not use your home plan for data.
Where a travel eSIM does not work the way you expect
WiFi reliability varies a great deal at remote lodges too. See five luxury lodges in Africa that make technology easy for older guests.
- Some newer iPhones have no physical SIM tray at all. Apple’s own support page confirms this started with iPhone 14 models bought in the United States. With the iPhone 17 line, Apple extended eSIM-only sales to several more countries, including Canada. If you bought your iPhone in one of these markets, it has no slot for a backup physical SIM, and you depend entirely on eSIM.
- China mainland, Hong Kong, and Taiwan have real restrictions. Apple’s own support page states that in China mainland, only the iPhone 17e and iPhone Air support eSIM. Third-party device guides report that Samsung phones sold in China, Hong Kong, and Taiwan typically do not support eSIM either, and Samsung’s own regional device lists are consistent with this, showing several models limited to Europe, North America, and Korea. If you are travelling to or through this region, plan on using a physical SIM there instead.
- A locked phone cannot add another provider’s eSIM until it is unlocked by your home carrier.
- Most travel eSIMs are single use. Providers state this directly: once installed, the same QR code generally cannot be reinstalled on a different device. If you delete your travel eSIM by mistake, the usual fix is contacting the provider for a new one, not reinstalling the same code. This is different from features that let you move your own existing number to a new phone of the same brand. Those do not apply to a one-time travel eSIM bought from a separate provider.
Common travel eSIM problems and how to fix them
- No eSIM option appears in your settings: check that your phone is unlocked and your software is up to date. Apple’s troubleshooting guidance suggests turning Airplane Mode on and off, and restarting your phone, as first steps.
- The QR code will not scan: increase the screen brightness on the device showing the code, or use the manual entry option with the activation code your provider sent instead.
- Your eSIM is installed but you have no signal: check that data roaming is switched on for that line once you arrive at your destination, and that your new eSIM, not your home SIM, is set as the active line for mobile data.
Your travel eSIM checklist before your next trip
- Check your phone’s settings to confirm it supports eSIM, and that it is unlocked from your home carrier.
- Buy your travel eSIM and set it up at home on WiFi, ahead of departure.
- Check your provider’s terms on when your data validity period begins.
- After installing, confirm your phone is set to use the new eSIM, not your home SIM, for data.
- If you are travelling to China mainland, Hong Kong, or Taiwan, check eSIM support for your specific phone model before you rely on it.
- Keep your provider’s installation email. If you need to reinstall, you may need to contact them rather than reuse the original QR code.
Three more things worth setting up before you go. See how to use Google Maps offline so you are never lost without data, how to video call your family while traveling without the confusion, and which translation app to set up before you go.
For more step-by-step help with your phone and apps, see our Tech for Travelers guides.